medium · February 22, 2026
Building a Serverless Text-to-Speech Pipeline with Amazon Polly and GitHub Actions
Pixel Learning Co. Is a education startup committed to accessibility and automation needs a solution to deliver course content in audio format — serving users with visual impairments and those who learn best by listening. Their existing course materials live on GitHub, and they want to leverage AWS AI services to automatically convert that content into audio files. The goal is a lightweight, cost-effective pipeline that stays fully serverless — no infrastructure to manage, no machine learning models to train.
We are going to utilize Amazon Polly and S3, integrated into a CI/CD pipeline with GitHub Actions. The project aims to:
- Automate Content Conversion: Automatically transform text files to audio upon changes in the repository, eliminating manual steps.
- Ensure Content Readiness: Maintain separate audio outputs for review (“beta”) and production, enabling better QA before release.
- Increase Accessibility: Provide audio versions of all course content, enhancing learning flexibility for all users.
- Minimize Overhead: Use managed AWS services to keep the system lightweight, fast, and cost-effective.
Why Would We Choose Amazon Polly?
Using Amazon Polly over custom text-to-speech systems or manual narration delivers several advantages:
- Speed and Simplicity: Polly provides near-instant speech synthesis without any ML training, ideal for rapid iteration.
- Scalability: Fully managed and serverless, Polly handles traffic spikes without any need for provisioning.
- Realistic Voices: Supports neural voice models for lifelike delivery in multiple languages and dialects.
- Easy Integration: Easily callable via Python scripts using boto3, fitting naturally into CI/CD pipelines.
Why GitHub Actions?
- Automation: GitHub Actions automates the detection of changes and deployment of new audio files.
- Environment Separation: Supports workflows triggered on PRs and merges to manage “beta” and “prod” audio versions.
- Developer-Centric: Runs directly in the dev workflow where the content lives, ensuring low-friction updates and version control.
What You’ll Need
- An AWS account
- A GitHub repository with your text content
- Basic familiarity with IAM and GitHub Actions
Step 1: AWS Setup
Create Your S3 Bucket
- Log into the AWS Console
- Navigate to S3 → Create Bucket
- Name your bucket and note the exact name — you’ll need it for GitHub Secrets
- Choose your region and leave default settings
- Click Create Bucket
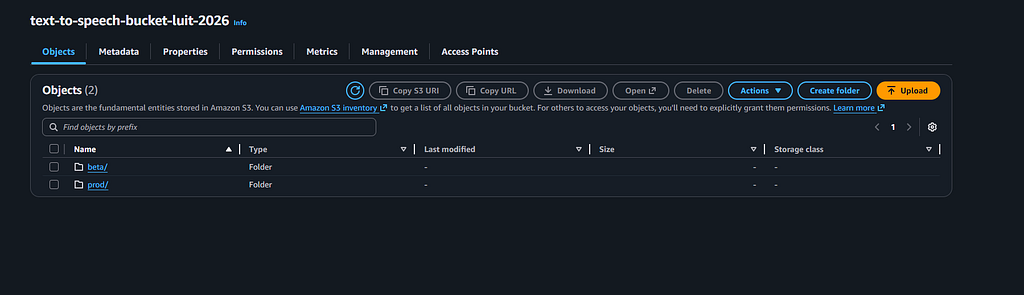
Once your workflows run, the bucket will automatically organize files into two folders:
- beta/ — files uploaded from pull requests via the deploy-beta job
- prod/ — files uploaded after merging to main via the run_polly job
Create an IAM User for GitHub Actions
- Navigate to IAM → Users → Create User
- Attach the following permissions policies:
- AmazonPollyFullAccess
- AmazonS3FullAccess
- Go to Security Credentials → Create Access Key
- Select Application running outside AWS
- Save your Access Key ID and Secret Access Key
Step 2: Configure GitHub Secrets
In your GitHub repo, go to Settings → Secrets and Variables → Actions → New Repository Secret and add the following:
Secret NameValueAWS_ACCESS_KEY_IDYour IAM user access key IDAWS_SECRET_ACCESS_KEYYour IAM user secret access keyAWS_REGIONYour AWS region (e.g. us-east-1)S3_BUCKET_NAMEYour S3 bucket name
Note: The beta and prod folder paths are hardcoded in the workflow files as S3_Path: beta and S3_Path: prod — they do not require secrets.
Step 3: Add Your Text Content
The text Polly converts lives in speech.txt at the root of your repository. Open the file and replace the contents with whatever you want converted to audio.
Welcome to Pixel Learning Co. This is your audio update for today.
Important: Keep content under 3,000 characters. This is the Amazon Polly limit for synchronous synthesis. For longer content, you’ll need to update the pipeline to use Polly’s asynchronous start_speech_synthesis_task method.
Step 4: Triggering the Workflows
This project uses two workflow files that trigger automatically based on your Git activity.
Beta Deployment — on_pr.yml
Trigger: Opening or updating a pull request targeting main
Job: deploy-beta
This workflow checks out your code, configures AWS credentials from GitHub Secrets, installs boto3, runs synthesize.py to generate example.mp3 via Polly, and uploads it to s3://
yaml
- name: Convert txt to mp3 (beta) run: | pip install boto3 --upgrade python synthesize.py aws s3 cp example.mp3 s3://$S3_BUCKET_NAME/$S3_Path/example.mp3
To trigger this workflow:
bash
git checkout -b my-feature-branch# edit speech.txtgit add .git commit -m "update speech content"git push origin my-feature-branch# open a pull request targeting main on GitHub
Production Deployment — on_merge.yml
Trigger: Push to main (i.e. merging a pull request)
Job: run_polly
Follows the same steps as the beta job and uploads the final file to s3://
yaml
- name: Convert txt to mp3 (prod) run: | pip install boto3 --upgrade python synthesize.py aws s3 cp example.mp3 s3://$S3_BUCKET_NAME/$S3_Path/example.mp3
Once you’re satisfied with the beta output, merge the pull request. The run_polly job triggers automatically.
Step 5: Verifying the Output
In the AWS Console
- Navigate to S3 → your bucket name
- You should see two folders: beta/ and prod/
- Click into either folder and select example.mp3
- Click Open or Download to listen
Using the AWS CLI
bash
# List files in betaaws s3 ls s3://your-bucket-name/beta/
# List files in prodaws s3 ls s3://your-bucket-name/prod/
# Download the prod file locallyaws s3 cp s3://your-bucket-name/prod/example.mp3 ./example.mp3
Checking GitHub Actions Logs
- Go to your repo → Actions tab
- Click the most recent workflow run (deploy-beta or run_polly)
- Expand the Convert txt to mp3 step
- Confirm you see upload: ./example.mp3 to s3://… with no errors
Challenges
This project really tested me and it took a while to solve all the issues.
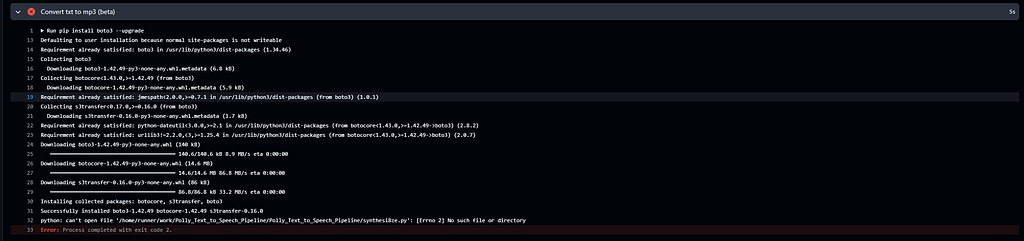
This project made me realize spelling and indentation are so critical as well as making sure naming is consistent in both yml files. I would go though line after line and fix what i saw and commit and push, look up errors. i had troubleshooted to the point where both files were showing up but the naming was off. I needed Claude to point out i had typed the same command twice and failed to add a file name to prod. It was humbling project teaching me to be more patient and to pay attention to all the details in my work.
Full repo is on GitHub