medium · April 3, 2026
Scaling a WordPress Publication with Docker Swarm on AWS: A Step-by-Step Deployment Guide
Prompt: Claude Image: Leonardo.AI
The Problem with Growing Fast
Level Up Publications covers the hottest trends in IT. But when your reader base grows faster than your infrastructure can handle, the publication goes dark at exactly the wrong moment during a traffic spike, when a container crashes, or when a restart wipes your database.
A single-server setup can’t absorb that. It needs to be replaced with something that scales on demand, recovers automatically, and isolates failures before they cascade.
That solution is Docker Swarm on AWS.
Why Docker Swarm?
Think of Docker Swarm like a kitchen brigade system. No single cook owns the whole service. Work is distributed, roles are defined, and the kitchen keeps running even when something breaks. Swarm works the same way. It distributes containers across a cluster of nodes, automatically replaces failed containers, and routes traffic without the user ever knowing something went wrong.
For a publication with fluctuating traffic: scale up to meet a viral article, scale down during off-peak hours, and keep the site live regardless.
What We’re Building
A 3-node Docker Swarm cluster on AWS EC2 running:
- MySQL — 1 replica, backend network only, persistent Docker volume
- WordPress — 3 replicas, port 80, accessible from any node via Swarm’s routing mesh
Two isolated overlay networks keep the database locked away from the public-facing layer. WordPress can reach MySQL, but nothing outside the cluster can.
Step 1 — Launch 3 EC2 Instances via AWS CLI
Start by gathering your prerequisites:
# Confirm your CLI is configuredaws sts get-caller-identity
# Get your default VPC IDaws ec2 describe-vpcs \ --filters "Name=isDefault,Values=true" \ --query "Vpcs[0].VpcId" \ --output text
# Get a subnet IDaws ec2 describe-subnets \ --filters "Name=defaultForAz,Values=true" \ --query "Subnets[0].SubnetId" \ --output text
# Get the latest Ubuntu 22.04 AMI IDaws ec2 describe-images \ --owners 099720109477 \ --filters "Name=name,Values=ubuntu/images/hvm-ssd/ubuntu-jammy-22.04-amd64-server-*" \ "Name=state,Values=available" \ --query "sort_by(Images, &CreationDate)[-1].ImageId" \ --output text
Create a key pair for SSH access:
aws ec2 create-key-pair \ --key-name swarm-key \ --query "KeyMaterial" \ --output text > swarm-key.pem
chmod 400 swarm-key.pem
Create the Security Group and open the required ports:
aws ec2 create-security-group \ --group-name swarm-sg \ --description "Docker Swarm Security Group" \ --vpc-id <YOUR-VPC-ID>
# SSHaws ec2 authorize-security-group-ingress --group-id <SG-ID> --protocol tcp --port 22 --cidr 0.0.0.0/0# WordPressaws ec2 authorize-security-group-ingress --group-id <SG-ID> --protocol tcp --port 80 --cidr 0.0.0.0/0# Swarm managementaws ec2 authorize-security-group-ingress --group-id <SG-ID> --protocol tcp --port 2377 --cidr 0.0.0.0/0# Node discovery TCPaws ec2 authorize-security-group-ingress --group-id <SG-ID> --protocol tcp --port 7946 --cidr 0.0.0.0/0# Node discovery UDPaws ec2 authorize-security-group-ingress --group-id <SG-ID> --protocol udp --port 7946 --cidr 0.0.0.0/0# Overlay VXLANaws ec2 authorize-security-group-ingress --group-id <SG-ID> --protocol udp --port 4789 --cidr 0.0.0.0/0
Launch all 3 instances:
# Manageraws ec2 run-instances \ --image-id <AMI-ID> --instance-type t3.micro \ --key-name swarm-key --security-group-ids <SG-ID> \ --subnet-id <SUBNET-ID> --associate-public-ip-address \ --tag-specifications 'ResourceType=instance,Tags=[{Key=Name,Value=swarm-manager}]' \ --count 1
# Worker 1aws ec2 run-instances \ --image-id <AMI-ID> --instance-type t3.micro \ --key-name swarm-key --security-group-ids <SG-ID> \ --subnet-id <SUBNET-ID> --associate-public-ip-address \ --tag-specifications 'ResourceType=instance,Tags=[{Key=Name,Value=swarm-worker-1}]' \ --count 1
# Worker 2aws ec2 run-instances \ --image-id <AMI-ID> --instance-type t3.micro \ --key-name swarm-key --security-group-ids <SG-ID> \ --subnet-id <SUBNET-ID> --associate-public-ip-address \ --tag-specifications 'ResourceType=instance,Tags=[{Key=Name,Value=swarm-worker-2}]' \ --count 1
Confirm all 3 are running:
aws ec2 describe-instances \ --filters "Name=tag:Name,Values=swarm-manager,swarm-worker-1,swarm-worker-2" \ "Name=instance-state-name,Values=running" \ --query "Reservations[*].Instances[*].[Tags[?Key=='Name'].Value|[0],PublicIpAddress,PrivateIpAddress,State.Name]" \ --output table

AWS Console Verification
Step 2 — Install Docker on All 3 Nodes
SSH into each instance and run the following block. Start with the manager, then repeat on both workers:
I ran into this very SSH issue. Permission will be denied otherwise.
WSL users — copy your .pem file into your WSL home directory before SSHing:
cp /mnt/c/Users/<you>/swarm-key.pem ~/.ssh/swarm-key.pemchmod 400 ~/.ssh/swarm-key.pemssh -i ~/.ssh/swarm-key.pem ubuntu@<PUBLIC-IP>
sudo apt-get update -y && \sudo apt-get install -y ca-certificates curl gnupg && \sudo install -m 0755 -d /etc/apt/keyrings && \curl -fsSL https://download.docker.com/linux/ubuntu/gpg | \ sudo gpg --dearmor -o /etc/apt/keyrings/docker.gpg && \sudo chmod a+r /etc/apt/keyrings/docker.gpg && \echo \ "deb [arch=$(dpkg --print-architecture) signed-by=/etc/apt/keyrings/docker.gpg] \ https://download.docker.com/linux/ubuntu \ $(. /etc/os-release && echo "$VERSION_CODENAME") stable" | \ sudo tee /etc/apt/sources.list.d/docker.list > /dev/null && \sudo apt-get update -y && \sudo apt-get install -y docker-ce docker-ce-cli containerd.io && \sudo usermod -aG docker $USER
Verify on each node:
docker --version
Step 3 — Initialize the Swarm
On the manager node:
docker swarm init --advertise-addr <MANAGER-PRIVATE-IP>
Copy the join token from the output. On both worker nodes:
sudo docker swarm join --token <TOKEN> <MANAGER-PRIVATE-IP>:2377
Back on the manager, verify the cluster:
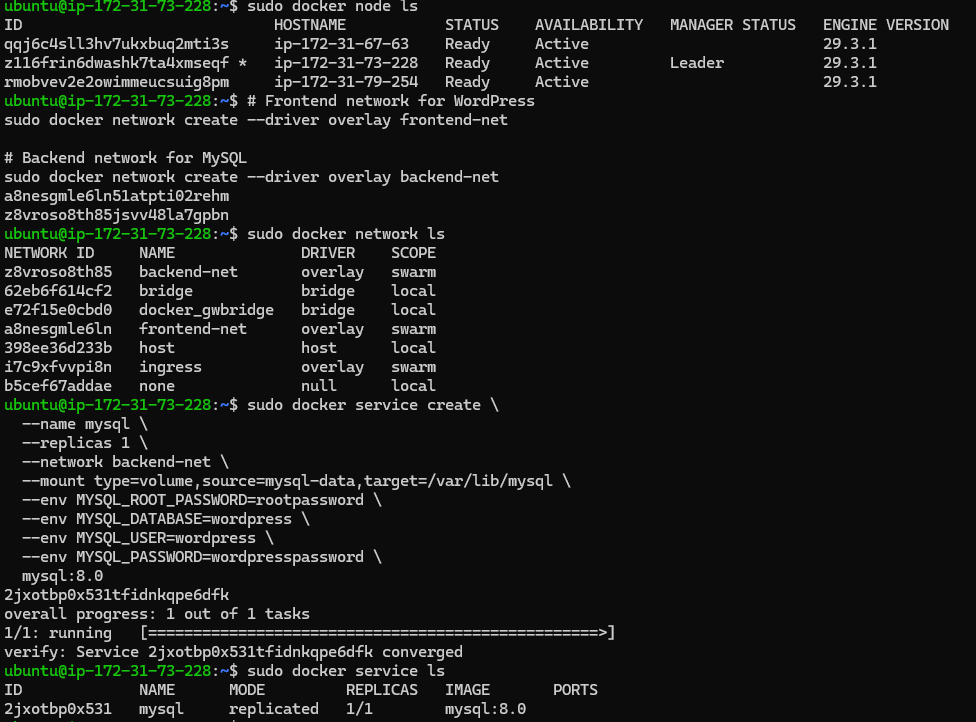
sudo docker node ls
You should see all 3 nodes Ready and Active, with the manager listed as Leader.
Step 4 — Create the Overlay Networks
sudo docker network create --driver overlay frontend-netsudo docker network create --driver overlay backend-net
Two networks — one public-facing, one internal. The separation matters: MySQL never touches the frontend network, which means it’s never directly exposed to incoming traffic.
Step 5 — Deploy MySQL
The –mount type=volume flag is what makes this resilient. If the MySQL container restarts, the data persists in the mysql-data Docker volume. Without this, every restart would wipe the database.
Verify:
sudo docker service ls
Look for 1/1 under REPLICAS.
Step 6 — Deploy WordPress
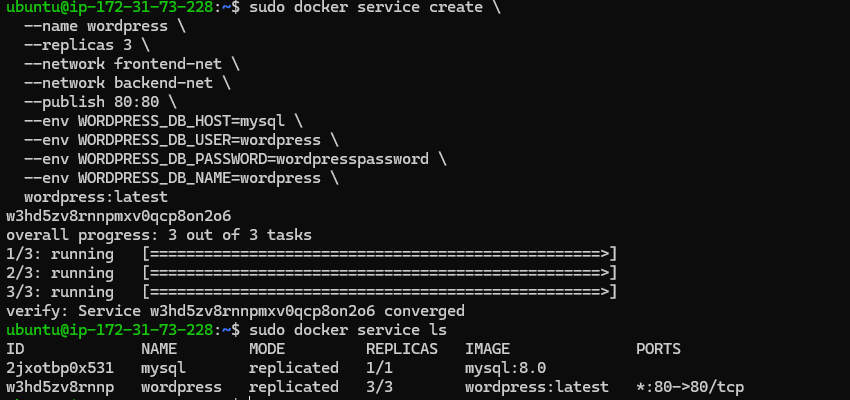
WordPress sits on both networks — frontend-net for public access, backend-net to reach MySQL by service name. Docker Swarm’s internal DNS resolves mysql automatically, so no IP addresses are hardcoded.
Verify:
sudo docker service ls
Look for 3/3 under REPLICAS.
The Result
Open any of the 3 public IPs in your browser on port 80:
http://<MANAGER-PUBLIC-IP>http://<WORKER-1-PUBLIC-IP>http://<WORKER-2-PUBLIC-IP>
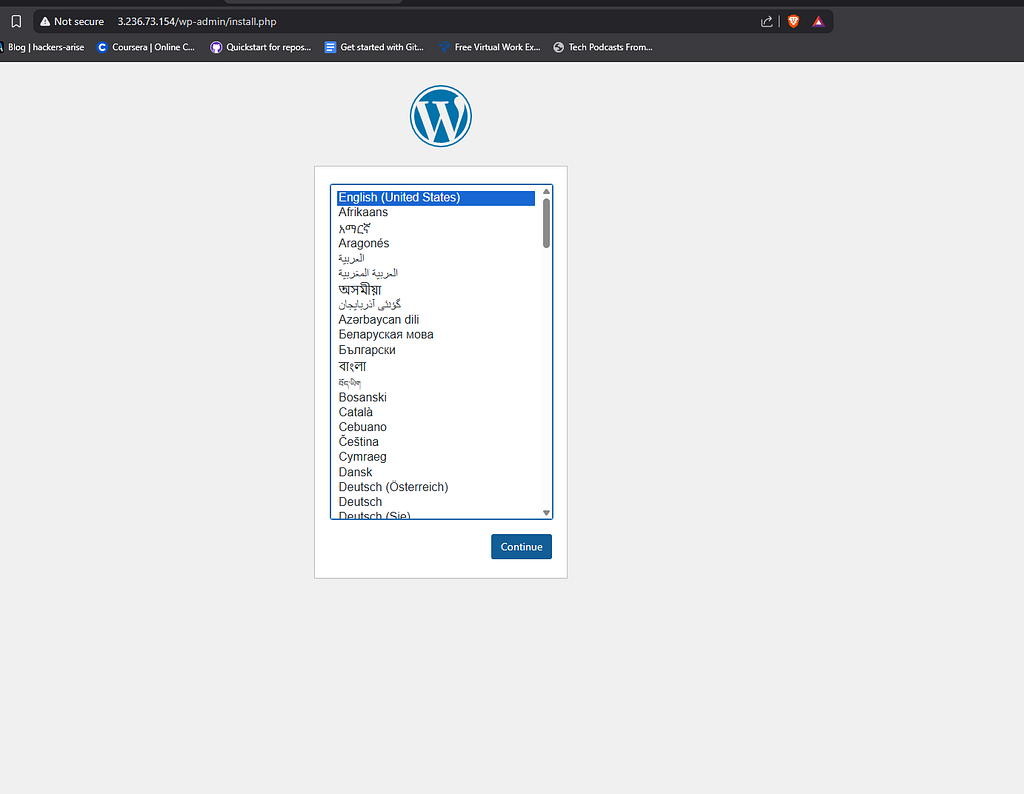
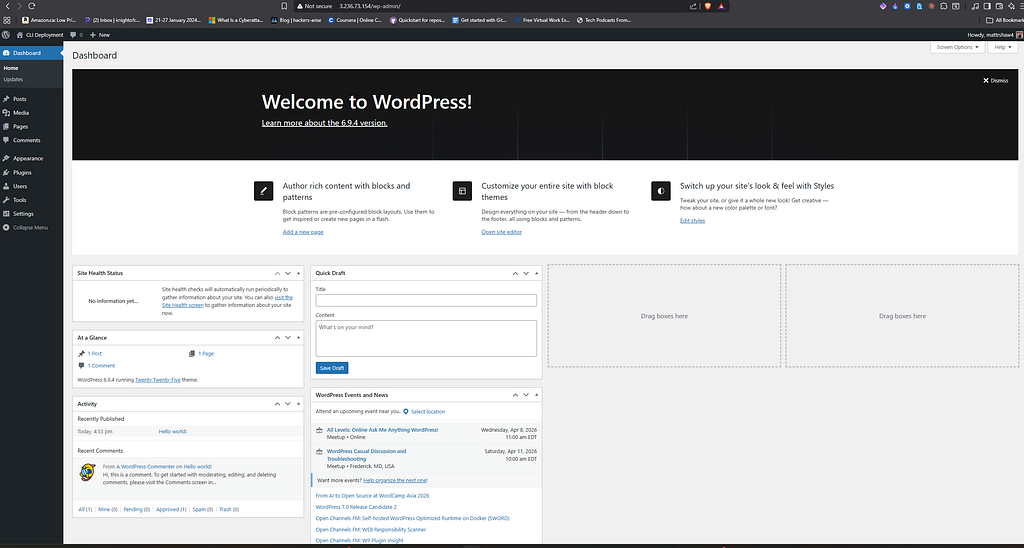
All three resolve to the same WordPress site. That’s Swarm’s routing mesh at work. Every node knows how to route traffic to a running container, regardless of which node it’s actually on.
Level Up Publications is now running on a distributed, self-healing, horizontally scalable infrastructure. If a container fails, Swarm replaces it. If traffic spikes, replicas can be scaled with a single command. If a node goes down, the publication stays live.
The Takeaway
A kitchen that can’t scale during service rush fails its guests. A web infrastructure that can’t scale during a traffic spike fails its readers. Docker Swarm on AWS gives Level Up Publications the same thing a well-run kitchen brigade gives a restaurant — distributed responsibility, automatic recovery, and the ability to keep running when individual components fail.
The build took less time than you’d expect. The resilience it provides lasts well beyond the initial setup.
What part of your current infrastructure would break first under 10x traffic? That’s probably where containerization makes the most sense to start.